aaPanel is a great new efficient and lightweight web server management tool that is slowly growing in popularity amongst server administrators.
But in this wide world of DDoS attacks and hackers attacking every website, how do we protect ourselves from the bad guys who want to steal all our cute kitten photos?
That’s where CloudFlare comes in. Blocking over 227B cyber threats everyday, CloudFlare excels at protecting over 20% of all website accessible to the public.
So why not take advantage of this great tool to help protect our aaPanel administrator login.
What you’ll need
- A CloudFlare login (FREE)
- Use the CloudFlare DNS service to manage the domain your aaPanel server has a hostname with (ie for this example we will be using demo.jrbconsulting.au)
- Have a working installation of aaPanel with an administrator login
A bit of background on CloudFlare’s proxy protection
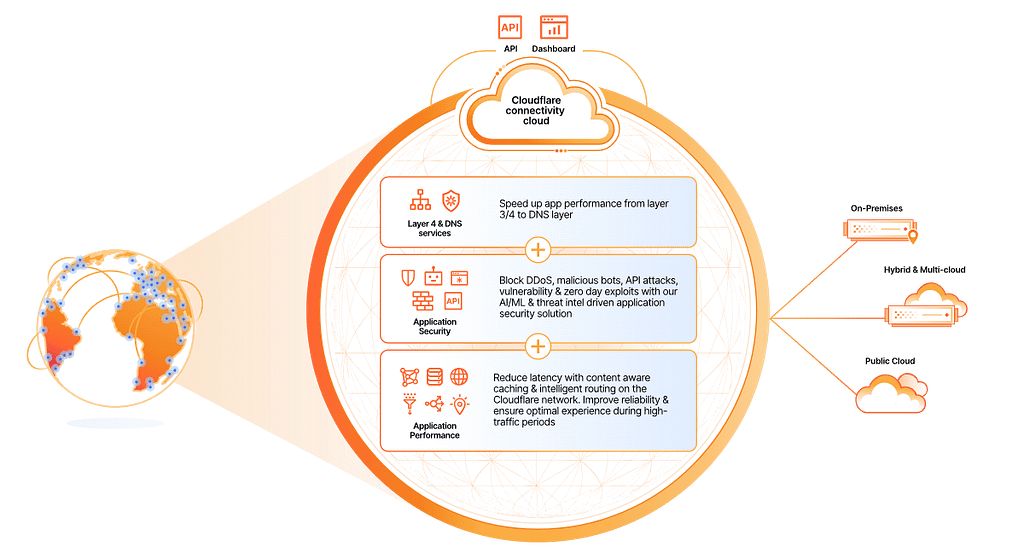
CloudFlare provides protection by taking the request from your browser (when you request a website ie www.thiswebsite.com), connecting it to a secure port (HTTPS) and then initiating a secure connection through to the server holding the website that you have requested.
In between, there is all sorts of magic and checks conducted without you even knowing. It checks your reputation, it checks the reputation of the server you are connecting to, it checks whether the pathway through all the different cables and conduits that the information moves through is secure and also whether you are connecting to the fastest route.
By the time the information hits your browser and the website starts showing, you can be certain that your connection is secure.
So the benefit to server administrators is mostly in the checks that CloudFlare conducts invisibly prior to the connction to your server. These checks start to weed known bad actors, API attacks, DDoS attacks and many more exploits before they even get to your server. Not bad for a free service. CloudFlare do have paid offerings which can in turn create an even more tailored security protection, but the free service alone is worth the time to configure it.
I’ve already got SSL configured on aaPanel, how does CloudFlare integrate with that?
CloudFlare offers the ability to proxy a few specific SSL ports. You can read up on them here.
At time of posting, those HTTPS ports are: 443, 2053, 2083, 2087, 2096 and 8443
So by choosing one of the above ports and changing our aaPanel administrator login to that port, we can then being the process of protecting our aaPanel administrator panel with CloudFlare.
Have a read through this guide and take your time, unfortunately it can be fickle to install and proxy correctly if done out of sequence.
Step One
So to start off we need to ensure that our hostname is added to CloudFlare DNS. You should have an A entry that looks like this. CNAME entries will also work if your entry shares the same IP as your domain.
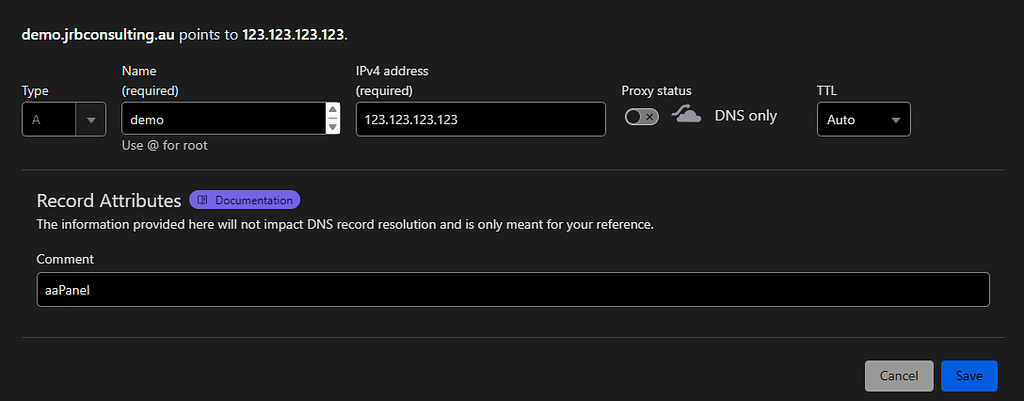
Just ensure that the Proxy Status is set to “DNS Only” or the toggle is in the off position.
Once done, hit save.
Step Two
Navigate to your aaPanel Administrator Panel.
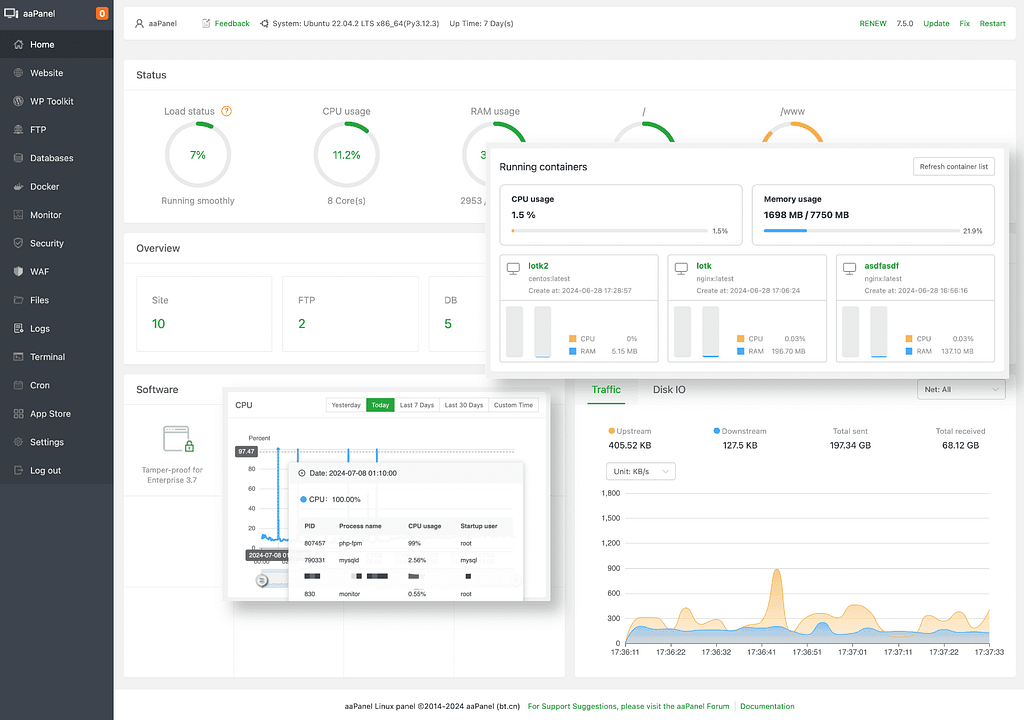
On the left hand menu, choose the “Security” option.
This should bring up the Security page with the “Firewall” tab open. If not, select the Firewall tab from the top menu.
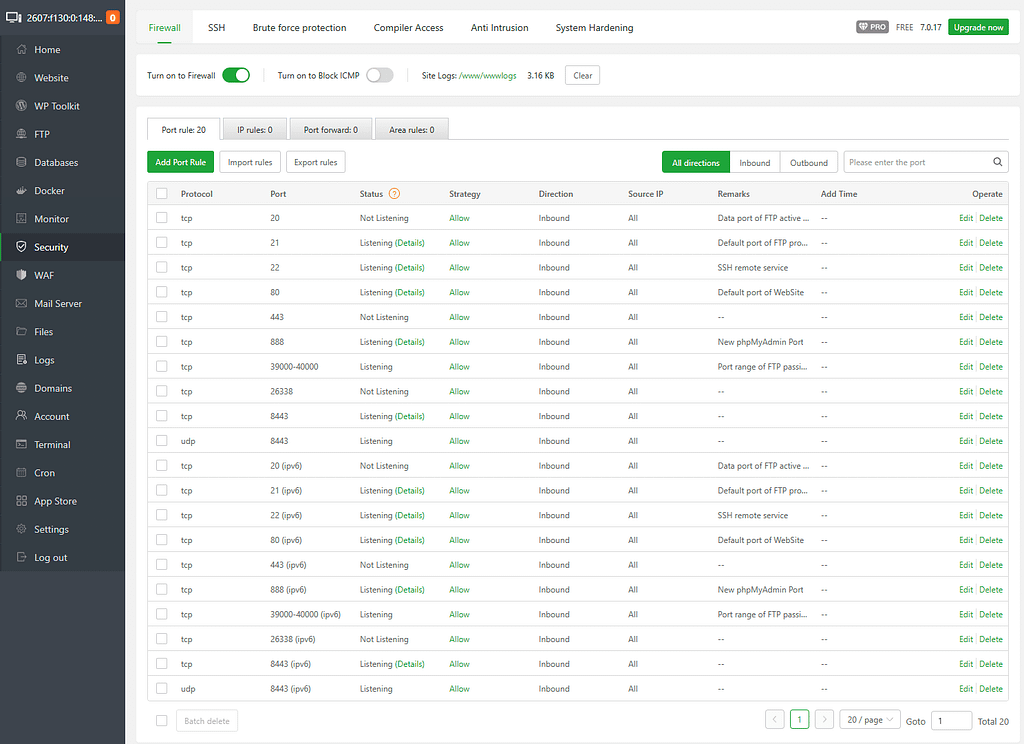
Next we need to add a firewall port rule for the new port that we will be using for the panel.
For this example, I am going to use port 8443.
Click on the green “Add Port Rule” button
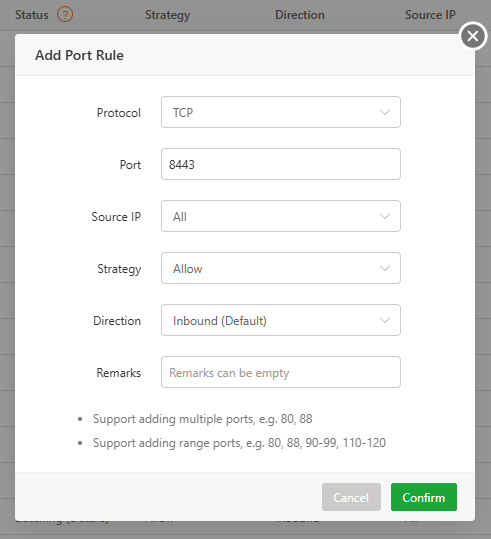
Fill out the form using 8443 or your chosen port in the “Port” box then hit Confirm to add the port.
This step is crucial as if you do not allow the port through, when we change it down further, you will lose access to your aaPanel login.
Step Three
Next we need to change the aaPanel access port to 8443.
On the left hand menu, select “Settings“
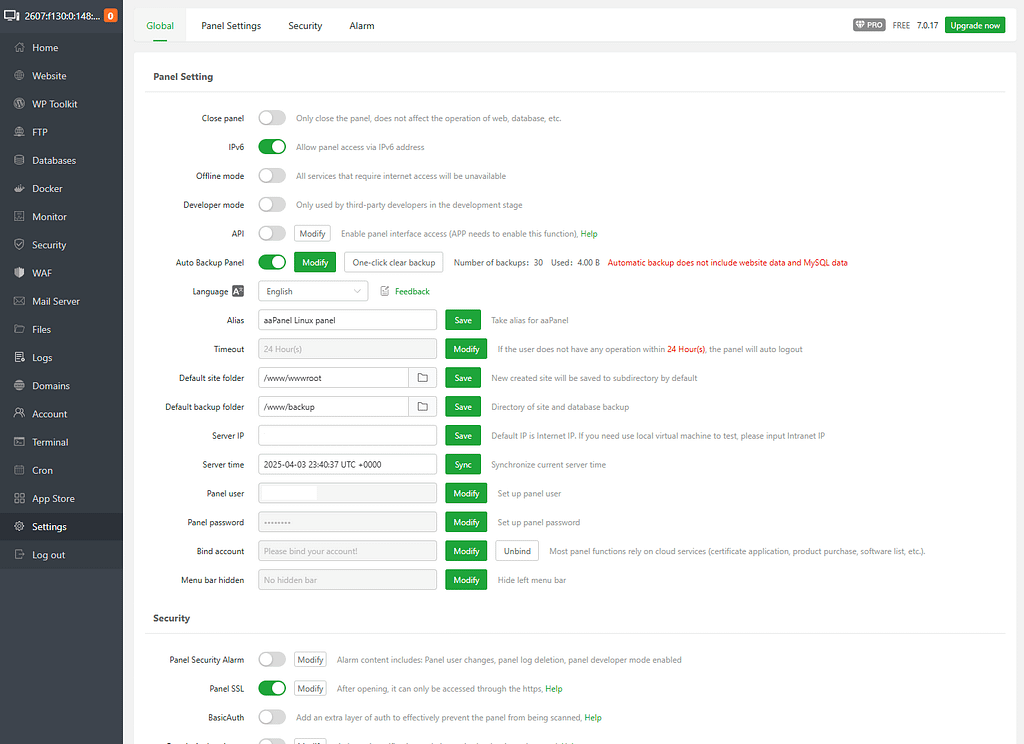
To narrow this down to the settings we will be working with, click on the “Security” tab at the top of the page.
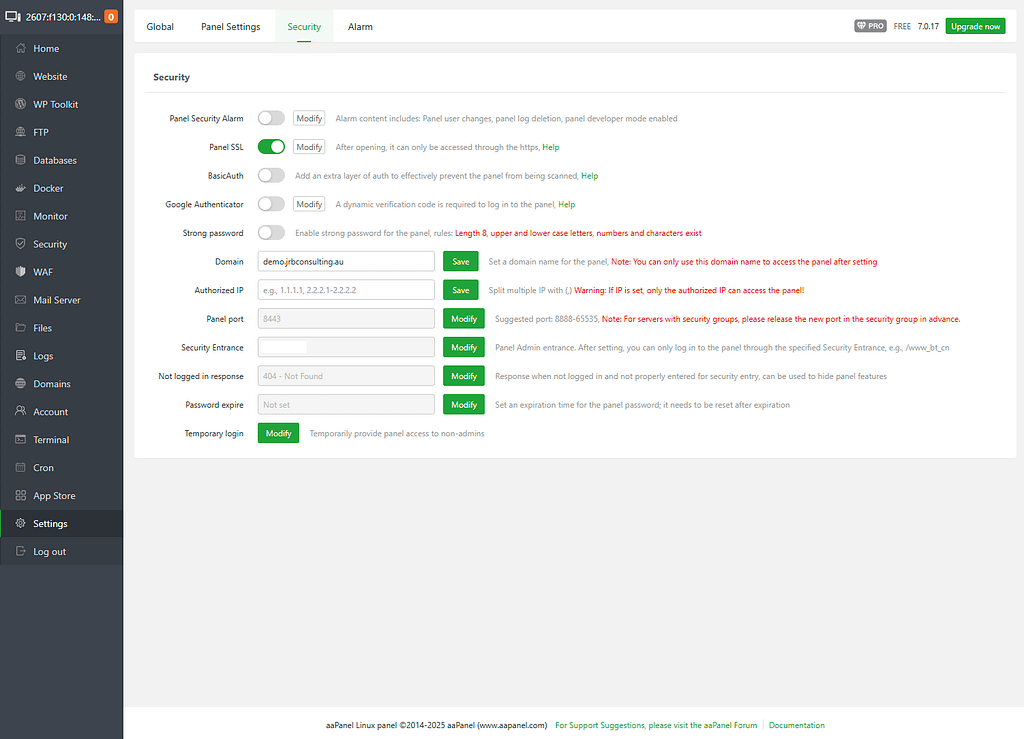
There are some settings here that we highly recommend to have set on a non-demo server ie Google Authenticator, Security Alarms etc.
But for the sake of this walkthrough, we will be working on the Panel Port setting.
In my screenshot, you will see I already have 8443 set, but you will most likely have a different port number, so click the “Modify” button next to Panel Port.
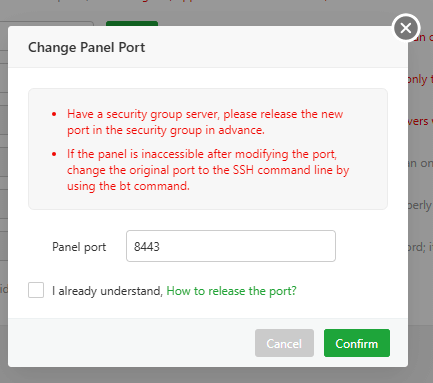
Enter 8443 or your chosen port number into the box, tick the “I already understand” box and press “Confirm”.
aaPanel will sit processing for a minute or 2 then redirect you to the login screen under the new port.
Step Four (optional)
This step is optional and depends on whether you wish to utilise CloudFlare origin server SSL certificates or use your own. If you wish to remain with your own, skip to the next step.
We will now install an origin server certificate (FREE) from CloudFlare on to our server. This helps encrypt and authenticate your server with CloudFlare’s proxy.
Navigate to the CloudFlare website and find the DNS for your domain name.
On the left hand menu, click on the dropdown next to “SSL/TLS” and select “Origin Server”.
Under the certificates page, click on the “Create Certificate” page.
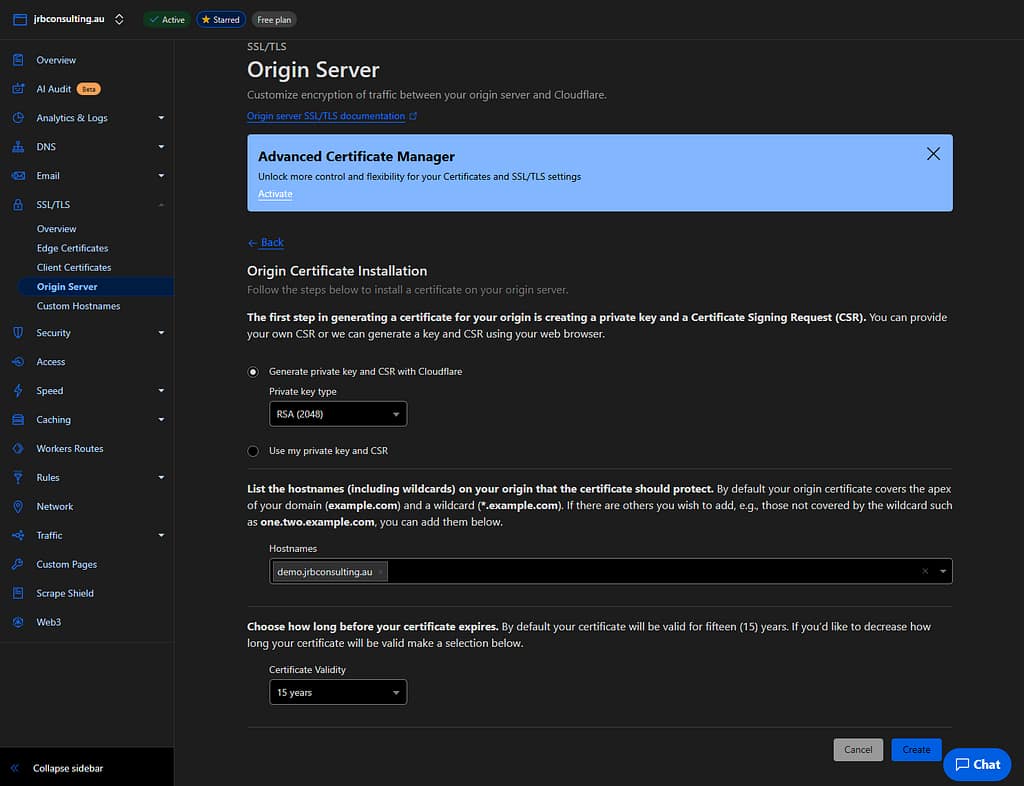
Type your hostname in the box and click “Create”.
If you know what you are doing with SSL settings and wish to change the settings, please feel free to but the default settings work for me.
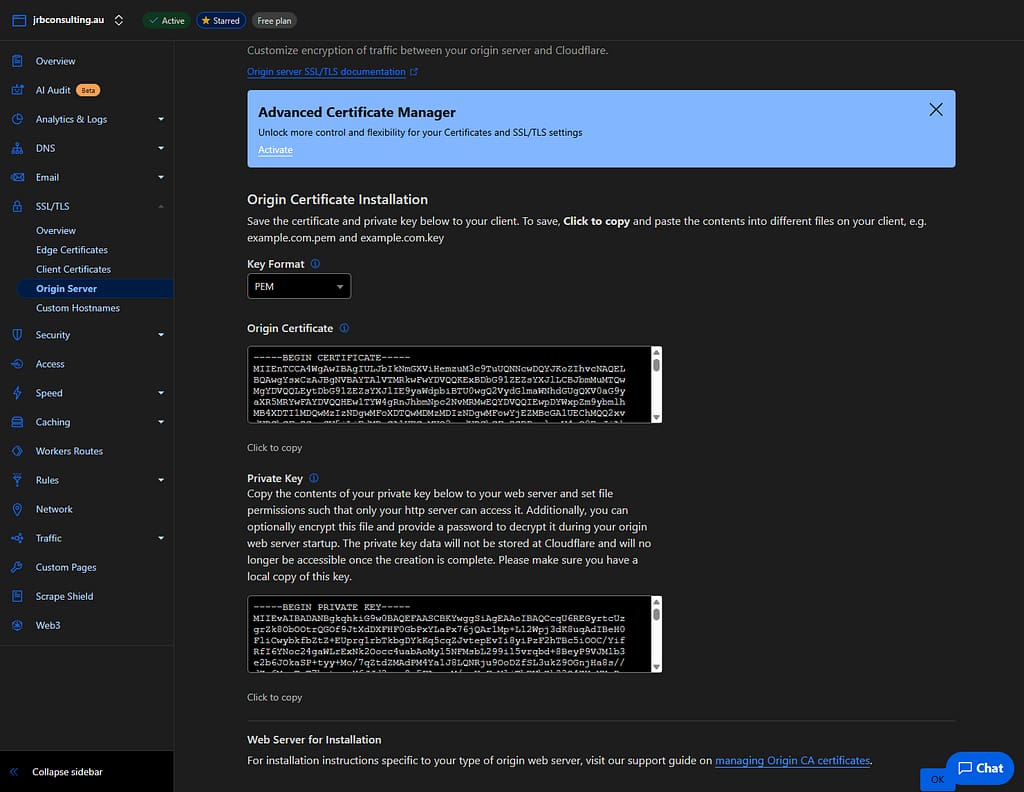
The next screen will bring up your certificate details and the Private Key / Origin Certificate. Both of these are needed to add them to aaPanel. Leave this screen open and jump back to your aaPanel installation.

Under your “Settings” -> “Security” tab, your Panel SSL toggle may or may not be off.
Click on the “Modify” button next to Panel SSL option.
If you do not have SSL, you will have to select “Provide my own certificate”, if you are using an existing certificate you will get a screen similar to mine.
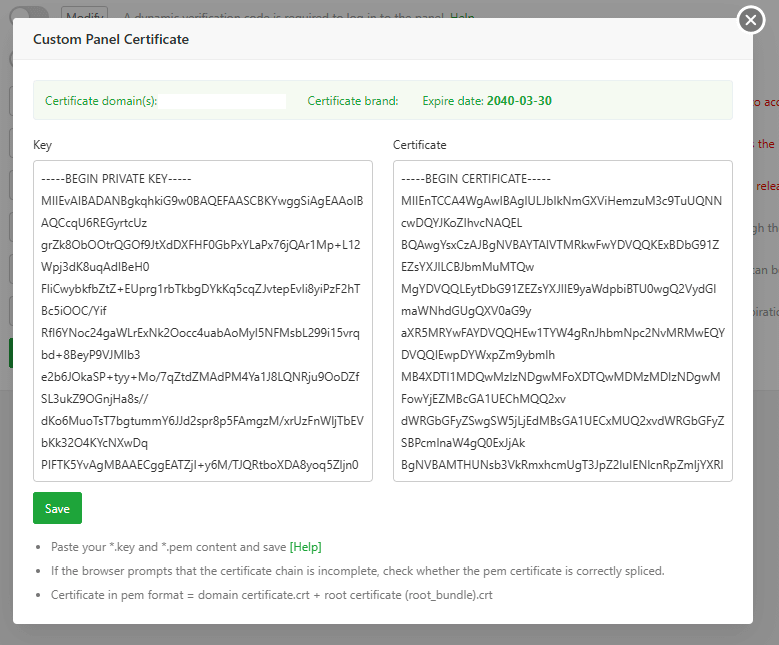
Paste your certificate and private key into the corresponding fields then press “Save”.
aaPanel will then save your certificate and throw you back to the login screen. It is very likely that the SSL certificate will be shown as a self signed by CloudFlare (as it is) and will flag a warning in your browser.
It is ok to accept this as the warning will go away after the next step.
If your server does not load correctly, clear the cache in your browser, close your browser and then reopen it.
Step Five
Now that we have the origin server certificate installed on the server, we need to tell CloudFlare to proxy the domain.
Jump back to your CloudFlare DNS settings and find your hostname (in our example demo.jrbconsulting.au), then click edit next to it’s entry.
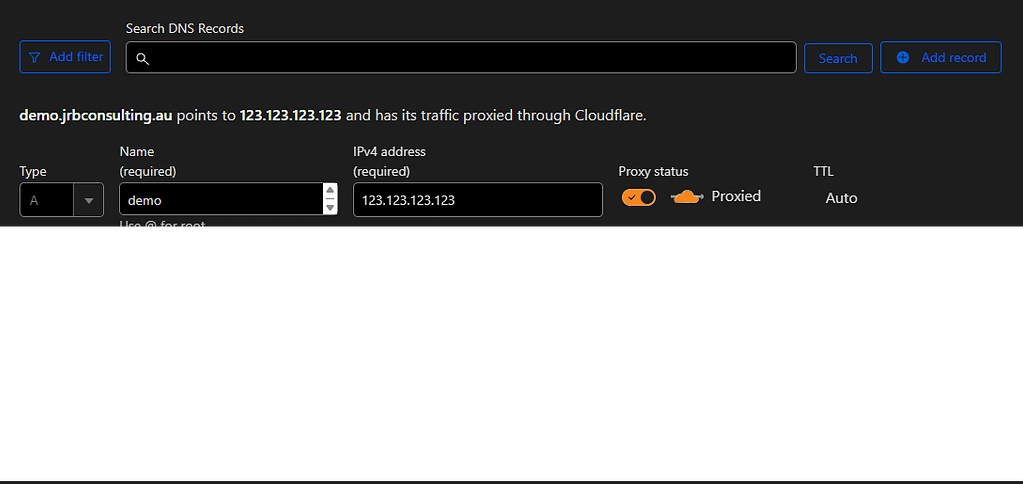
This time turn the “Proxy Status” toggle to on and the cloud should go orange and change to “Proxied”.
Hit save and you’re good to go.
Your aaPanel login now has the protection of the CloudFlare network and if it didn’t already have SSL, now has a secure port and certificate attached.
Sometimes it takes a few hours for the browser to validate the certificate, but if you want to expedite it, clear your cache, close the browser and reopen it.


